
During the last winter I accomplished one of my childhood’s dream. See the Himalayas and do an Annapurna Trekking or an Everest Trekking.
Why did I pick the Annapurna Massif as my first adventure in the Himalayas? Easy, I got to talk with several people while on my Eastern Asian trip and all of them agreed that it was the best choice as a first contact with the Himalayas. Basically, because it has several options.
Some people go to Poon Hill, which is the easier trek. Others do the Annapurna Base Camp or the Annapurna Circuit, which are harder and take longer. And then, there are who do them all, Poon Hill, Annapurna Base Camp and the Annapurna Circuit.
I wanted a challenge, not just to see the roof of the world. But I wasn’t so sure I’d be able to make it to the end. That was my biggest fear before I finally decided to do this trekking. Happily, I ended up sleeping at the house of a trekking guide in Kathmandu. Thanks to CouchSurfing. I didn’t know he was a guide though, since he didn’t say anything about it in his profile.
Contents
Why is still a challenge to do an Annapurna Trekking?
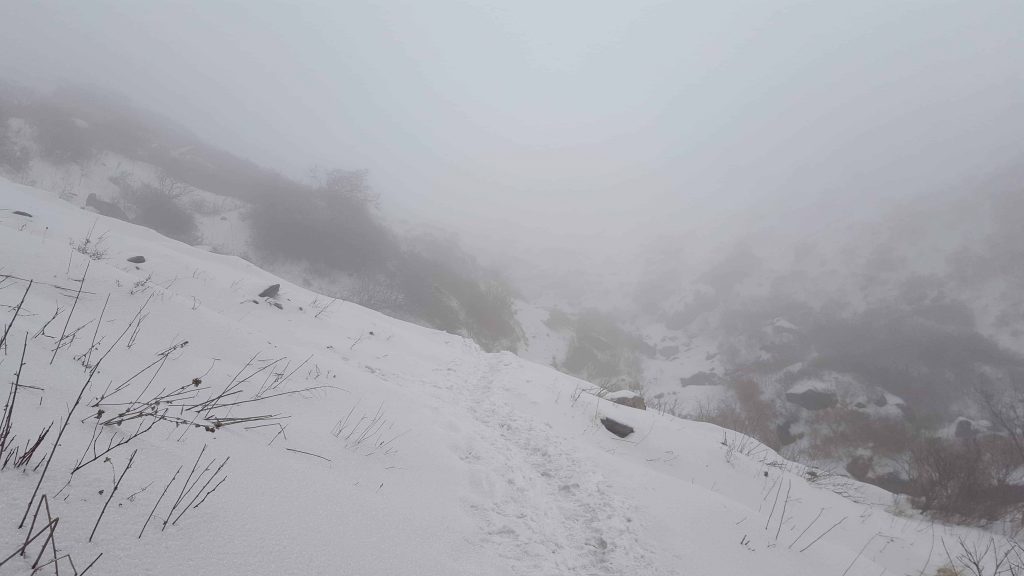
As you will read later, the freezing temperatures, specially at night, are a common companion during this trek.
If you go for any of the long treks (Annapurna Base Camp or Annapurna Circuit), the duration says it all. Not everyone is capable of doing a 5+ days trek. And the combination of them is a 3 weeks trek, which is definitely a real challenge.
The Nepali mobile operators do their best, but having cell phone signal isn’t very common here. You’d have it at some points only.
Having a shower is not always possible. Either because the water is literally frozen, or because you are too up to get a shower. Check the “Practical Tips” section of this post to know more.
Accessibility by jeep is very limited or almost impossible at some points. Concretely, you can’t go by jeep further between Manang and Muktinath. That part is exclusively a hiking trail. So if you get an issue there, like serious altitude sickness or a tough injury, you’ll have to get an helicopter. Or go by donkey/horse, which is commonly used to transport goods to the hostels in those regions.
You could literally die here. It isn’t something that happens every year, but on 2014 there was a snowstorm disaster that caused 43 deaths. Besides that, and again in the “Practical Tips” section, you could find other dangers on the trail.
Do you need a trekking guide to do the Annapurna trekking?
Definitely no. My friend guides many people every year to do the Everest Base Camp, the Annapurna Circuit or the Annapurna Base Camp. And he was quite clear to me, as long as you know a few tips about altitude sickness, have a decent hiking level and the proper equipment, you are good to go. His biggest advice was to NEVER WALK ALONE.
Why never walk alone? The highest part of Annapurna Circuit is Thorong La Pass, at 5,416m (17,769 ft). So it’ll be cold, very cold. Even way before getting there, you can expect freezing temperatures from the beginning. Annapurna Base Camp is at 4,130 m (13,550 ft), and it’s as cold as Thorong La. Poon Hill is cold too, although not as much as the other ones.

As a summary, just find a trekking companion or walk next to someone else at a distance you can see them. Or they can see you.
However, if you still want to hire a guide, I can vouch for Mantra Adventure trekking guides. They are official trekking guides and do trekkings all around Nepal.
How long is it going to be?
That will obviously depend on the route or routes you pick for the Annapurna Trekking. An approximation could be this one:
- Poon Hill: Getting to Poon Hill is by far the shortest and fastest path. If you are not a very experienced hiker, will be 2 days (around 10h non-stop) to get here, and another 2 to go back to Nayapul. Nayapul is the most common starting point for this trek. If you are in good shape, it can take you one day (around 7h). The total length from Nayapul to Poon Hill is 19.4 km.
- Annapurna Base Camp (or ABC for friends): It really doesn’t matter if you make it to the ABC or you reach the MBC instead (Machapuchare Base Camp). This time will be 3 to 4 days to get to the top, and approximately the same to come back (6-8 days in total). Could be 2 days to get to the top plus 2 more to come back, if you are in a really really good shape (around 4 days in total). The length from Nayapul to ABC is 42.5 km.
- Annapurna Circuit: This is the longest of the 3 treks, 140km from Besisahar to Jomsom. Which is the typical origin/destination pair. You can expect to make it between 12 and 16 days, depending on how fit you are.
If you go for all of them, as some people do, you could make it in 20-26 days. My friends and I made it in 20 days, with 2 nights break after the Annapurna Circuit. Then we did the Poon Hill, and ended up doing the Annapurna Base Camp trekking.
How to get to the starting points of the routes?
If you are doing Poon Hill or the Annapurna Base Camp, then from Kathmandu get a bus to Pokhara. It shouldn’t be more than 700 rupees. After that, you need to get another bus to Nayapul (next to Birethani).
If you want to do the Annapurna Circuit, then you’ll have to go to Besisahar. There are buses from Kathmandu too. I paid 550 rupees, other friends paid 600.
Try to get into a comfortable bus, either you go to Pokhara or to Besisahar. It’s a long ride of 7h, so you’ll appreciate it.
The buses from and to Pokhara and Besisahar depart between 7 and 10 AM. After that isn’t common to get one. From Pokhara to Nayapul there are plenty of buses.
How and where to get the permit for the Annapurna Conservation Area Project (ACAP)
While on the trek, I had the chance to talk with some trekkers and got to ask them about this. Everybody got their permit in Kathmandu. My friend, the trekking guide, said the same thing. So don’t go to Pokhara before getting it, or you might have to go back there.
This is the location of the Nepal Tourism Board office:
The office opens everyday from 10AM to 5PM, including Saturdays, Sundays and Holidays.
This is the list of things you will need to do:
- Get 4 passport size pictures
- Bring your passport to the office
- 4.000 Nepali Rupees
- Fill the forms for the TIMS card and the ACAP permit
While filling the forms, you will see information related to the trekking guide company. Just leave them blank. The staff of the office will ask you when will you finish the trek. The permit allows you to stay until 1 month, so say 1 month. Then you’ll see how long it takes you.
It will take you an hour, approximately, to have everything done. When I went there it was quite empty, so I was done in 30-40 minutes.
Map and itinerary to Poon Hill
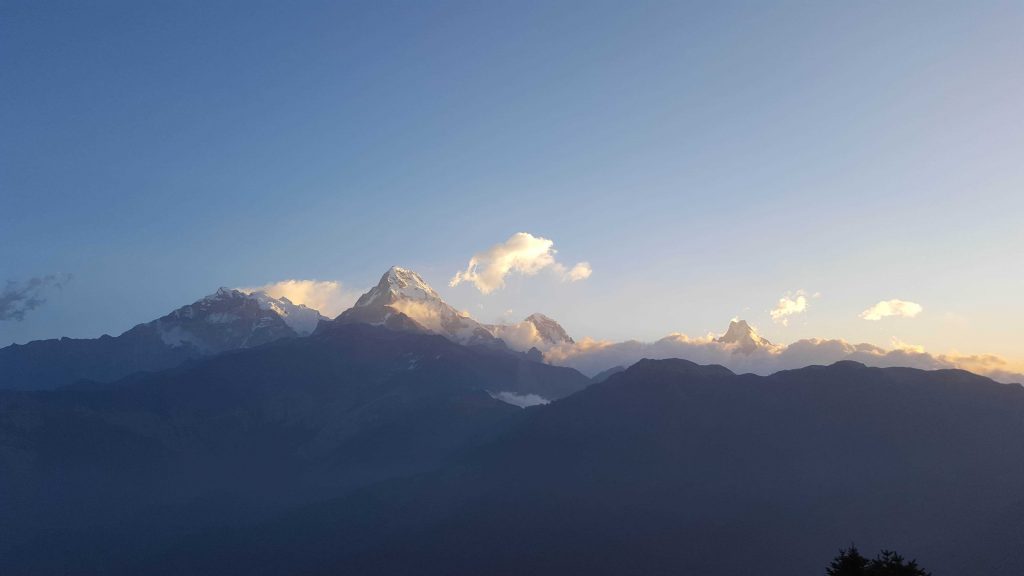
This is the easier of any Annapurna Trekking you could do. However, is still a very impressive place, and gathers many tourists that come to Nepal. Exclusively to take pictures from here and contemplate the sunrise.
Route from Birethani to Poon Hill going through Ulleri and going back through Ghandruk:
So it could take you either 2 days, to go from Birethani to Ghorepani (Poon Hill) and back. That if you walk fast. If you take your time, you would probably take between 3 and 4 days to do this trail.
Or if you prefer to do a longer trek, then you could:
- Walk from Birethani to Poon Hill
- Then go to Tadapani and Ghandruk
- Return back to Birethani
That could be done in 2-5 days, depending on your pace.
Map and itinerary to the Annapurna Base Camp
I encourage you to go up through Ghandruk, and then come back via Landruk. If you do that, then you’ll have a different scenery than if you go up and down on the same path. Besides that, going through Landruk on the way back, will be a bit easier, since it’s downhill.
You’ll see how you feel while on the trail. It’s difficult for me to tell you an itinerary, since it all depends on your fit. However, I’ll try to suggest you a couple of itineraries based on your pace.
Relaxed pace:
- Start in Birethani and sleep in Ghandruk. It’s a beautiful stop, with great views of the valley and old town feeling. 10km length.
- On the second day, continue until you get to Chhomrong. It will be 10 more kilometers. Here there are some bakeries where you can enjoy a croissant or a cinnamon roll. There are plenty of places where to eat and sleep. Don’t miss to show your permit, there’s a checkpoint.
- On the 3rd day, I’ll try to reach Dovan. That will make almost 9.5km more.
- For the 4th day, make it to the Machapuchare Base Camp (MBC). It’s nice to get there before 2PM, so you can skip the cold wind and maybe even the snow. By 1-2PM is quite normal for the weather to change there and get worse. I won’t sleep in the Annapurna Base Camp (ABC). It’s worse for the altitude sickness, and colder. This day will be 8km.
- The 5th day wake up early, and try to leave the MBC by 7-8AM. Head to the ABC and try to not stay there after 11AM. Leave your back at your hostel in the MBC for this part, so you can go lighter. Just pick it up on your way down. Go back to Dovan. It’ll be a hard day. 14km.
- On the 6th day, try to make it to Jhinu Danda. There you could enjoy of the local hot springs, which would be thankful after 6 days hiking. It’ll be a 12km trek.
- The last day would be mostly downhill. It’s 15km though. Some people skip the last 5-7 kilometers and they do it by bus. The road is quite dusty, since there are vehicles going up and down. That is up to you.
Fast paced itinerary:
- Start in Birethani and go until Kimorong Khola. Don’t miss Ghandruk, you could have a lunch there. This day length is 16km.
- From Kimorong Khola, go through Chhomrong and reach Dovan. The 2nd day length would be 13,5km.
- For the 3rd day, try to wake up early and make it to the Annapurna Base Camp. It’s 11km. If you still have energy go back to the Machapuchare Base Camp and sleep there (14km if you do this).
- The 4th day, go down as much as possible. It’d be nice to get to Jhinu Danda, and enjoy the hot springs there. After a 20km trek would be a pleasure.
- On the last day head straight to Birethani. There would be 15km, mostly downhill. Get the bus if you want to skip the dusty road. Although it was nice to me.
Map and itinerary to the Annapurna Round Circuit
The Annapurna Round Circuit is the biggest challenge among the routes described in this post. Doing the Annapurna Base Camp is not an easy thing though. But the 140km that you have to do from Besisahar to Jomsom, the huge elevation difference you will experience, and the pass of Thorung La, make of this trek a big thing.
Some trekkers keep on going after Jomsom, and continue until Tatopani or even until Ghorepani Deurali (next to Poon Hill). But the most common route is this one. Then is up to you to make it longer than that.
A recommended itinerary by several guides I met on the way is this one:
- You could either walk the first kilometers, through the dusty road, or get a jeep and reach Ghermu or even Jagat. The guys I was walking with decided to go with the jeep, since they had a tight schedule. If you walk from Ghermu, it’s a 13.5 km trek to Tal. If you walk from Besisahar to Ghermu, add one more day. Tal is in a very peaceful spot.
- The 2nd day would be pretty much uphill, until Timang. Another 13.5km. This is by far one of the best views I had while in a town on the trek. You could enjoy the Manaslu Peak from there.
- The third day would be an easy one, in order to get ready for the following one. We will go from Timang to Chame, through 8km that would be quite flat. Take it easy and enjoy the day. You could explore the surroundings of Chame and/or Timang.
- The next day, our intention is to get to Lower or Upper Pisang. It really depends if you want to have a higher view or not. However, in Upper Pisang, you could enjoy of a nice temple and a Stupa. There will be 14-15 km, depending on your final destination.
- On the 5th day, we will walk from Lower Pisang to Manang. This is the bigger town on the Annapurna Circuit. Don’t miss the chance to get any missing/faulty equipment. There are 16 km from Lower Pisang to there.
- The 6th day would be an acclimatization day. You will thank it in advance. Take the chance to walk something and visit the Stupa at the top of the hill (on the northern side). Or enjoy a short walk to the hills on the southern part, on top of the Gangapurna lake. Seeing the Gangapurna peak from up there is fantastic. It’s great to walk in order to improve the acclimatization.
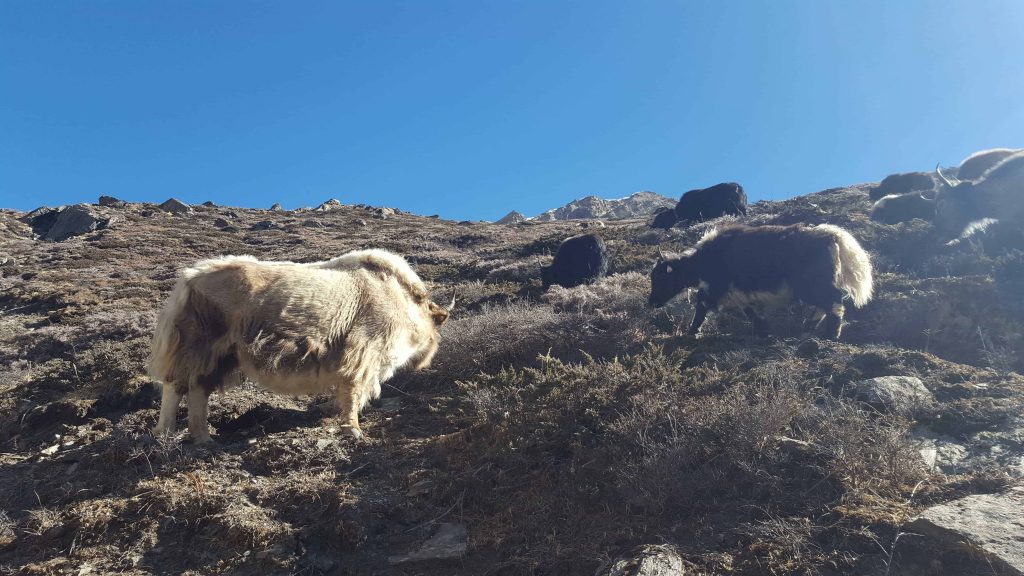
- The following day would be a tough one, since you will reach for first time the 4,000m. The goal for today is Yak Kharka. It’s a pretty small place. From here on, you will be able to see Yaks (and the females, Naks).
- The 8th day would be an easy one, but beware of the rocks on the way. They fall down often, right before arriving to Thorung Phedi. It will be only 6,7km. If it isn’t too cold at night, and you still have energy, you could go up to High Camp and sleep there. But I’d sleep in Thorung Phedi, as many locals do, in order to keep altitude sickness symptoms away. It could be a good thing to hike up to High Camp (or almost there), and then go down to Thorung Phedi, without your backpack. So you’ll be better acclimatized.
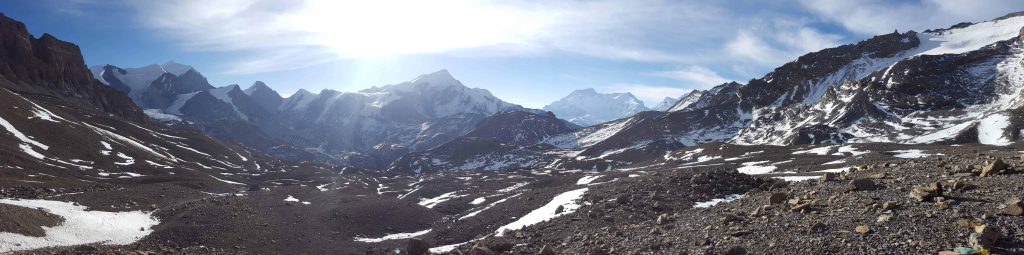
- The 9th day is the tougher and the best day. You will reach the summit, Thorung La Pass, at 5,416m. It would be damn cold, specially since it’s recommended to leave Thorung Phedi by 4:30 or 5AM (don’t forget your headlamp). Why? Simple. From 10:30-11AM a cold wind usually starts to blow at the pass. You definitely want to avoid it. The destination is Muktinath. And there would be 15km, with almost 1km up (880m) and then 1,690m down. Get the thermal clothing for that day, you’d definitely need it, at least until you start going down from Thorung La to Muktinath.
- The 10th day you could either walk from Muktinath to Kagbeni, or reach Jomsom. The landscape is really different from here on, much drier. Walking to Kagbeni is about 3h. To Jomsom almost 6h. There are buses from Kagbeni to Jomsom and from Muktinath as well.

Once you get to Jomsom, you could do any of the following options:
- Fly back from the Jomsom airport to Kathmandu
- Get a bus from Jomsom to Pokhara (it’ll take you a whole day)
- Get a bus from Jomsom to Tatopani, and start any of the previous Annapurna trekking. Either Poon Hill, or Annapurna Base Camp, or first Poon Hill and then Annapurna Base Camp It’ll take you one day to get to Ghorepani (Poon Hill) from Tatopani.
- Get a bus from Jomsom to Tatopani (there is a hot spring there), and then another one to Pokhara
- Continue trekking from Jomsom to Tatopani (the first part is dusty)
Practical tips
- Risky routes: Do not go through the Tilicho Lake to Jomsom if you don’t get a green light by locals. In the winter time is usually empty of trekkers and locals. Besides, there’s only a hostel, in the Tilicho Lake, and it is usually closed during winter. Even going to the Tilicho Lake in winter time is not recommended by locals.
- Rocks falling between Yak Kharka and Thorong Phedi: This was the most dangerous part of the whole trek. Not because of the weather, not because of any animal. There were rocks falling down through the trail. You’ll see a sign when you are almost in Thorong Phedi. You’ll realize when you get to the critical point. Just run fast, cover your head with your hands, and try to go as close as possible to the wall. I haven’t heard of anyone getting killed by the rocks here, but don’t want you to be the first one. Wait one day if there’s fog in the morning, otherwise you won’t see the rocks falling down.
- Altitude sickness recommendations:
- Don’t have showers above 3,500m, neither cold nor warm.
- Don’t miss the acclimatization day.
- Bring tablets against it.
- If you feel bad, go downhill until you feel better.
- Drink lots of water. Specially warm water. Apparently ginger tea helps.
- What to bring with me to sleep? During the winter time is very cold up there. I brought a sleeping bag for -10ºC, and even used an extra blanket (the staff of the hostels will provide it to you). However, what the trekking guides do is to bring a very thin sleeping bag, and then ask for 2 or 3 thick blankets. That way, they will carry less weight and would be able to bring a smaller backpack too. Ask for the blankets right after getting into the hostel, specially when not in winter time.
- What about accommodation and food? Well, this isn’t really a problem. you’d find plenty of hostels on your way. Between 2 and 3 hours from town to town.
- Are there any springs or taps for water? In some towns, there is an ACAP Safe Drinking Water Station. Normally in the ones I have mentioned in the itineraries. However, during the winter time, the water would be frozen above 2,500m. You can either buy it from the hostels (they sell bottles, or hot water). Or refill a bottle with tap water and then add a water tablet to purify it, which was the cheapest and the most convenient and ecological for me.
- Is there mobile signal to call or have Internet? At the beginning of the article, I mentioned that the signal is very limited. I met a trekking guide over there, and he had a couple of SIM cards. One for each of the 2 mobile operators in Nepal. I asked him if he had signal all the way and he was quite clear, nope. But at least he normally had while on the towns/villages. Some hostels charge you for Wi-Fi. If you get a couple of SIM cards, the cost will be equivalent to paying the Wi-Fi a couple of nights at a hostel. But you’d have Internet for a whole month. I paid 300 rupees for a 2GB/month SIM card.
- Can I do the Annapurna Circuit in reverse? Sure, you could. However, just locals do it. The part from Muktinath to High Camp/Thorung Phedi is tougher to do the other way around. Besides, it will take you longer to walk uphill that way, to get to Thorung La Pass, then you’ll risk getting caught by the freezing cold wind. And the most important issue, the elevation gain is way higher that way. DEFINITELY NOT RECOMMENDED!!!
Best moment to do it
Weather is the main issue while deciding to do an Annapurna Trekking. While I was there, I asked locals and trekking guides. They all agreed that the winter months are the less busy ones, and that from March/April, it starts getting busy (and warmer).
I went there on February 2017, and it was quite cold at night. While we were above 2,000m the temperature was between -10ºC and -30ºC (this was only between Throung Phedi and Thorung La Pass).
About the rain, I always check Weather and Climate, and you can see that it rains a lot between May and September, being just a bit rainy on October. That means that between the second half of October and April, there won’t be rain. It didn’t rain a single day while I was there (20 days in total).
From December to February is quite empty of people, so you could see from time to time a trekker there. Poon Hill is excluded from that, many people go there anyway. No matter what.
So, if you don’t mind the cold, December to February are the best months. And October, November, March and April if you prefer warmer temperatures, although you’ll get to be with much more people.
Recommended equipment for the trek
Doing an Annapurna Trekking requires some preparation, not only physically and mentally talking. So it’s important to spend some time and get the correct equipment with you.
First of all, I won’t tell you any lie about this topic. You can obtain all the equipment you need once in Nepal. Kathmandu and Pokhara have a lot of trekking shops. Specially Kathmandu. So if you don’t want to bring many things with you on the plane, or are traveling long time and can’t bring everything with you, just buy it there. Besides, the equipment has a good price there.
However, if you are thinking to get the trekking equipment in advance, and you want to be sure to get the quality you want, then keep reading.
Sleeping bag
Earlier, in the Practical Tips section, I mentioned that some trekking guides don’t bring with them their sleeping bag in winter. If you don’t want to bring it with you, and travel lighter, you might want to get a thin sleeping bag with you. Some beds are a bit dustier and dirty, so could be a good idea.
Link to super thin and light sleeping bag (only 227gr): http://amzn.to/2rTOcSp
If you want a warmer sleeping bag (comfort 0-10 ºC and -10ºC extreme conditions): http://amzn.to/2rU2cvu
And if you prefer to go for the best option (comfort -0.9ºC, limit -6.9ºC and -24.8ºC extreme): http://amzn.to/2rQoLSl
Water and windproof trousers
Having windproof trousers is the most important thing to bare in mind here. Unless you are going to do the Annapurna Trekking from May to October.
Men windproof and waterproof and breathable trousers: http://amzn.to/2qjYLwR
Women waterproof, windproof and breathable Gore-Tex trousers: http://amzn.to/2rhnoPz
Thermal underwear
Definitely an item that would be appreciated while at the Annapurna Base Camp and surroundings, and near Thorung La Pass. Don’t miss it, specially in winter time.
Men thermal underwear: http://amzn.to/2qW7kzS
Women thermal underwear: http://amzn.to/2qWcagy
Trekking boots
Probably the most important item to include in your checklist. I brought high mountain boots and have no regrets with it. Some people had lower ones, or even with sport shoes. For me, I had no single blister during the whole trek (20 days).
Salomon Men’s Quest 4D 2 GTX Hiking Boo (this one are mine): http://amzn.to/2rQksqk
Salomon Women’s X Ultra Trek Gtx High Rise Hiking Boot: http://amzn.to/2rgY3VV
Water Purification Tablets
I might have gotten tricked, but I paid 10€ (1,000 rupees) for 25 L tablets. That was way too much. If you don’t want to deal with this, buy them in advance. Here a pack for 100 L:
Water Aluminum Bottle
This is a 1L aluminum bottle that’d be very convenient for using with the purification tablets: http://amzn.to/2qk0ZMF
Apparently, if you use the tablets with a plastic bottle, the chemical reaction could be hazardous. Besides that, bringing an aluminum or reusable plastic bottle is great for the environment.
Windproof and waterproof jacket
An item hard to forget, the jacket. Like the trousers, they should be windproof, and if they are waterproof much better. Here a few options.
iLoveSIA Men’s Waterproof Mountain Jacket: http://amzn.to/2qVYyUF
Berghaus Women’s Skye Jacket : http://amzn.to/2qk0TVh
Power bank
A very useful gadget to bring with you to an Annapurna Trekking is a portable battery. Either for your phone, your camera or your ebook reader. At some hostels, they will charge you for electricity. In my experience it was some sort of each 2 days you got free electricity. So basically you’ll need a power bank that will charge your phone 2-3 times, or your phone + camera one time.
This one is a great option. It has 10000mAh capacity, fast charging and is one of the lightest in the market:
Apúntate a nuestra newsletter semanal
Te enviaremos un correo cada semana con el nuevo artículo junto a las novedades de nuestra app móvil de senderismo.
2 thoughts on “Annapurna Trekking, still a challenging experience”